The layer’s alpha channel determines how much of the layer’s content and background shows through. Fully or partially opaque pixels allow the underlying content to show through but fully transparent pixels block that content.
The default value of this property is nil nil. When configuring a mask, remember to set the size and position of the mask layer to ensure it is aligned properly with the layer it masks.
NSDateFormatter 不是唯一一个创建的开销就很昂贵的类,但是它却是常用的、开销大到 Apple 会特别建议应该缓存和重复使用实例的一个。
Creating a date formatter is not a cheap operation. If you are likely to use a formatter frequently, it is typically more efficient to cache a single instance than to create and dispose of multiple instances. One approach is to use a static variable.
#ifdef DEBUG// Only log when attached to the debugger# define DLog(...) NSLog(__VA_ARGS__)#else# define DLog(...) /* */#endif// Always log, even in production#define ALog(...) NSLog(__VA_ARGS__)
如果 boundle 中得某个图片只显示一次,推荐使用 + (UIImage *)imageWithContentsOfFile:(NSString *)path,系统就不会缓存该图片。参考 Apple 的文档:
If you have an image file that will only be displayed once and wish to ensure that it does not get added to the system’s cache, you should instead create your image using imageWithContentsOfFile:. This will keep your single-use image out of the system image cache, potentially improving the memory use characteristics of your app.
将 UIView 的属性 clearsContextBeforeDrawing 设置为 NO 在多数情况下可以提高绘制性能,尤其是在你自己用绘制代码实现了一个定制 view 的时候。
If you set the value of this property to NO, you are responsible for ensuring the contents of the view are drawn properly in your drawRect: method. If your drawing code is already heavily optimized, setting this property is NO can improve performance, especially during scrolling when only a portion of the view might need to be redrawn.
By default, UIKit clears a view’s current context buffer prior to calling its drawRect: method to update that same area. If you are responding to scrolling events in your view, clearing this region repeatedly during scrolling updates can be expensive. To disable the behavior, you can change the value in the clearsContextBeforeDrawing property to NO.
When true, and the layer’s opacity property is less than one, the layer is allowed to composite itself as a group separate from its parent. This gives the correct results when the layer contains multiple opaque components, but may reduce performance.
The default value of the property is read from the boolean UIViewGroupOpacity property in the main bundle’s Info.plist. If no value is found in the Info.plist the default value is YES for applications linked against the iOS 7 SDK or later and NO for applications linked against an earlier SDK.
上述引用来源已不存在,可以参考 CALayer.h。
(Default on iOS 7 and later) Inherit the opacity of the superlayer. This option allows for more sophisticated rendering in the simulator but can have a noticeable impact on performance.
When this property is set to YES, the graphics context used to draw the layer’s contents queues drawing commands and executes them on a background thread rather than executing them synchronously. Performing these commands asynchronously can improve performance in some apps. However, you should always measure the actual performance benefits before enabling this capability.
Any drawing that you do in your delegate’s drawLayer:inContext: method or your view’s drawRect: method normally occurs synchronously on your app’s main thread. In some situations, though, drawing your content synchronously might not offer the best performance. If you notice that your animations are not performing well, you might try enabling the drawsAsynchronously property on your layer to move those operations to a background thread. If you do so, make sure your drawing code is thread safe.
Letting Core Animation determine the shape of a shadow can be expensive and impact your app’s performance. Rather than letting Core Animation determine the shape of the shadow, specify the shadow shape explicitly using the shadowPath property of CALayer. When you specify a path object for this property, Core Animation uses that shape to draw and cache the shadow effect. For layers whose shape never changes or rarely changes, this greatly improves performance by reducing the amount of rendering done by Core Animation.
When the value of this property is YES, the layer is rendered as a bitmap in its local coordinate space and then composited to the destination with any other content. Shadow effects and any filters in the filters property are rasterized and included in the bitmap.
autorelease 的实现实际上调用 NSAutoreleasePool 将 self 加入当前的 autorelease pool 。Autorelease pool 现在时运行时的一部分,所以这样做不是很直接,但是 autorelease pool 的 API 是私有的,所以这样实现也是目前最好的办法了:
-(void)doesNotRecognizeSelector:(SEL)aSelector{char*methodTypeString=class_isMetaClass(isa)?"+":"-";[NSExceptionraise:NSInvalidArgumentExceptionformat:@"%s[%@ %@]: unrecognized selector sent to instance %p",methodTypeString,[[selfclass]description],NSStringFromSelector(aSelector),self];}
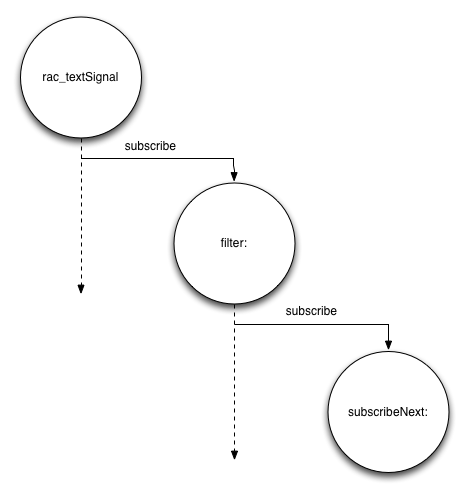
[[self.textField.rac_textSignalfilter:^BOOL(NSString*value){return[valuelength]>=3;}]subscribeNext:^(NSString*value){NSLog(@"Text field has been updated: %@",value);}];